Setting up XAMPP: General Notes
Setting up XAMPP is not terribly difficult or
time-consuming. It lets you test your website at a special URL,
http://localhost/, that makes it possible to use root-relative paths, run PHP
scripts, and do other kinds of things your live website will do.
Windows instructions immediately follow; Mac users can jump right to the OS X instructions.
XAMPP Setup: Windows
These steps have been tested with XAMPP version 1.7.4 on a USB drive on Windows XP, Windows Vista, and Windows 7. Please contact the author if you run into any problems so that these instructions can be improved, if necessary.
- Download either the ZIP or the 7zip archive of XAMPP for Windows from the XAMPP site; do not download the installer. The 7zip archive is smaller, so it downloads faster; but it may take longer to unzip, up to 10 or 15 minutes, depending on the speed of your computer.
- Unzip the ZIP or 7zip archive; if you don’t have an unzipping utility, try 7-Zip.
-
Copy the unzipped
xamppfolder to the root of your USB drive (in other words, don’t place it inside of another folder). If your unzipping program has created a folder that hasxamppinside of it (e.g., some unzipping programs will create a folder likexampp-win32-1.7.4-VC6/), move just thexamppfolder to the root of your drive. Depending on the speed of your USB drive, that, too, make take a little while, too (15 or 20 minutes).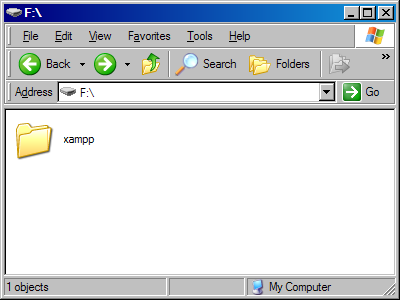
Windows XP screenshot of the
xamppfolder in its proper place: in the root of a USB drive (in this case, the USB drive’s letter is F:). -
Load XAMPP by double-clicking on the
xamppfolder and finding and then double-clicking thexampp-control.exefile. (If you don’t see the.exeextension, the file will still work—but you should Google for show file extensions and the name of your operating system (Windows 7, Windows Vista, Windows XP; see pages 45-47 in the book). -
Start the Apache web server by clicking the Start button on the XAMPP Control Panel.
Windows Vista and Windows 7 users may get a warning about Windows Firewall; click Cancel
on any firewall warning windows that pop up.
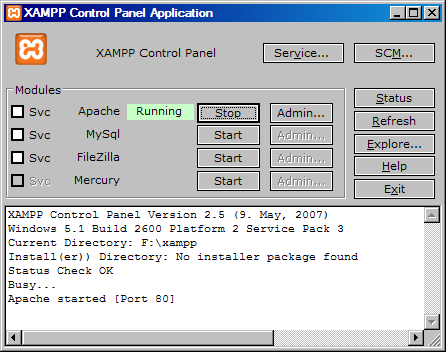
Windows XP screenshot of the XAMPP Control Panel with the Apache web server running.
-
Test that XAMPP is running properly by going to the URL
http://localhost/in your browser (type the whole thing, including thehttp://part; notice there’s no www. or .com). You should see the XAMPP welcome screen if all is working correctly.
Windows XP screenshot of the XAMPP splash screen in Firefox.
-
Some users may get an error from XAMPP that states another service is using Port 80
(Skype, for example, is known to use that port.) If everything is working for you,
skip to the next step. If you get an error like that, use your text editor (like
Notepad++) to open up the
httpd.conffile. Go to thexamppfolder, then into theapachefolder, and finally into theconffolder, where you will find the thehttpd.conffile. Locate the line in the file that readsListen 80using the Find function in your text editor. Around line 37, you will find a block of text that looks like:# # Listen: Allows you to bind Apache to specific IP addresses and/or # ports, instead of the default. See also the <VirtualHost> # directive. # # Change this to Listen on specific IP addresses as shown below to # prevent Apache from glomming onto all bound IP addresses. # #Listen 0.0.0.0:80 #Listen [::]:80 Listen 80
Comment out the line that readsListen 80by putting a hash (#) in front of it; below that line, write your own line that readsListen 8000. This part of your file will now look like:# # Listen: Allows you to bind Apache to specific IP addresses and/or # ports, instead of the default. See also the <VirtualHost> # directive. # # Change this to Listen on specific IP addresses as shown below to # prevent Apache from glomming onto all bound IP addresses. # #Listen 0.0.0.0:80 #Listen [::]:80 #Listen 80 Listen 8000
Start or stop and start Apache from the XAMPP Control Panel. Point your browser tohttp://localhost:8000/, and you should see the XAMPP welcome screen. Remember to usehttp://localhost:8000/instead ofhttp://localhost/when you’re developing your site. -
To develop your own site, you’ll want to rename the existing
htdocsfolder inside of thexamppfolder tohtdocs-original. (You can rename it back if you need, for example, to configure the MySQL database for use with WordPress development.) Then create your own newhtdocsfolder for your site, or download, unzip, and copy over thehtdocsfolder from the Rapid Prototyping Kit and get to work on your site. (You might want to stop and restart Apache in the XAMPP Control Panel before you start working.)
XAMPP Setup: Mac OS X
Unfortunately, the OS X version of XAMPP will not run on a USB drive; you must have administrative rights on any Mac that you wish to install and run XAMPP on. These instructions have been tested on OS X Leopard and OS X Snow Leopard using XAMPP version 1.7.3. Please contact the author if you run into any problems so that these instructions can be improved, if necessary.
- Download XAMPP for Mac OS X (Universal Binary) from the XAMPP site. Double-click the installer, and drag the XAMPP folder to your Applications folder. (You may have to enter your adminstrative username and/or password).
-
Find the XAMPP Control application, which will be in an
XAMPPfolder inside of yourApplicationsfolder. Double-click the XAMPP Control application to launch. -
A little Control window will pop up; click the Start button next to Apache. You will be
prompted to enter your administrative username and/or password.
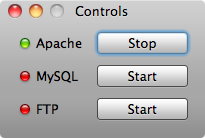
Mac OS X screenshot of the XAMPP Control window, with Apache running.
-
Open your browser to
http://localhost/; you should see the XAMPP splash page. If you are getting an error about another service using Port 80, see the end of this document. -
Now things get a little complex. The
Applicationsfolder on a Mac is a restricted area of sorts, so it’s important to configure XAMPP to read from anhtdocsfolder than you can write to from your user account easily. - Go to your home folder in a Finder window; Look for the little house icon with your username next to it, and click on it.
-
In the Finder window, create a new
htdocsfolder (File > New Folder from the Finder menu). Or, download and unzip the Rapid Prototyping Kit (RPK) and copy itshtdocsfolder to your home folder. -
In your favorite text editor (like
TextWrangler), create a new
text file and put a little line of text in it, like:
Hello there! This is just to test XAMPP.
Save the file ashello.txt, inside of thehtdocsfolder you created or moved over from the RPK. Thehello.txtwill be for testing your new XAMPP configuration. -
Now use your text editor to open the XAMPP
httpd.conffile. This contains the Apache Web server configuration that XAMPP uses. Go to theApplicationsfolder, thenXAMPP, thenetc; you'll seehttpd.conflisted there. Open it. -
Once you’ve opened the
httpd.conffile, you should immediately make a copy of it, just in case you make a mistake. Choose File > Save As... in your editor, and save the file ashttpd.conf.original. You will probably be prompted for your administrative username and password. -
Then, choose File > Save As... again and save as
httpd.conf, so that you’re back to editing thehttpd.confthat XAMPP reads (and not thehttpd.conf.originalfile that you can use in an emergency). -
Now to edit the
httpd.conffile. Use the Find function in TextWrangler (Search > Find...) and search for the textDocumentRoot(one word, no space). TextWrangler should take you to around line 174 of thehttpd.conffile, where you will see:# # DocumentRoot: The directory out of which you will serve your # documents. By default, all requests are taken from this directory, but # symbolic links and aliases may be used to point to other locations. # DocumentRoot "/Applications/XAMPP/xamppfiles/htdocs" #
-
Comment out the
DocumentRootline that’s there by putting a hash (#) in front of it. Then, on the line below the one you comment out, write a new DocumentRoot line, replacingyourusernameas in the example below with your real username on your Mac. The DocumentRoot part of your file should now look like this:# DocumentRoot: The directory out of which you will serve your # documents. By default, all requests are taken from this directory, but # symbolic links and aliases may be used to point to other locations. # # DocumentRoot "/Applications/XAMPP/xamppfiles/htdocs" DocumentRoot "/Users/yourusername/htdocs" #
-
Next, scroll down a little further (about 30 lines) in the
httpd.conf, where you will see:# # This should be changed to whatever you set DocumentRoot to. # <Directory "/Applications/XAMPP/xamppfiles/htdocs"> # # Possible values for the Options directive are "None", "All", # or any combination of: # Indexes Includes FollowSymLinks SymLinksifOwnerMatch ExecCGI MultiViews # # Note that "MultiViews" must be named *explicitly* --- "Options All" # doesn't give it to you. # -
As you did with the DocumentRoot line, you’ll comment out the
<Directory ...line by inserting a hash (#) in front of it. Start a new line below it, following the pattern of the line you commented out, and write the same path you did in the DocumentRoot line above. This part of your file should now look like:# # This should be changed to whatever you set DocumentRoot to. # # <Directory "/Applications/XAMPP/xamppfiles/htdocs"> <Directory "/Users/yourusername/htdocs"> # # Possible values for the Options directive are "None", "All", # or any combination of: # Indexes Includes FollowSymLinks SymLinksifOwnerMatch ExecCGI MultiViews # # Note that "MultiViews" must be named *explicitly* --- "Options All" # doesn't give it to you. # -
Save the file as
httpd.conf; you might have to enter your administrative username and password again. -
Now the moment of truth: if you left XAMPP running, stop and then start it again from the
XAMPP Control window. Point your browser to
http://localhost/hello.txt, the text file you created; you should see your simple “Hello there! This is just to test XAMPP.” message. If you do, go ahead and delete thehello.txtfile. You are now ready to start building your site, and testing it on a local web server.
Some users may get an error from XAMPP that states another service is using Port 80 (Skype,
for example, is known to use that port.) If you get an error like that, open up the
httpd.conf file, and search for Listen 80 using the find function.
Around line 30, you will find a block of text that looks like:
#
# Listen: Allows you to bind Apache to specific IP addresses and/or
# ports, instead of the default. See also the <VirtualHost>
# directive.
#
# Change this to Listen on specific IP addresses as shown below to
# prevent Apache from glomming onto all bound IP addresses.
#
#Listen 12.34.56.78:80
Listen 80
Comment out the line that reads Listen 80 by putting a hash (#) in
front of it; below that line, write your own line that reads Listen 8000. This
part of your file will now look like:
#
# Listen: Allows you to bind Apache to specific IP addresses and/or
# ports, instead of the default. See also the <VirtualHost>
# directive.
#
# Change this to Listen on specific IP addresses as shown below to
# prevent Apache from glomming onto all bound IP addresses.
#
#Listen 12.34.56.78:80
#Listen 80
Listen 8000
Start or stop and start XAMPP from its little Control window. Point your browser to
http://localhost:8000/hello.txt, and you should see your see your simple “Hello
there! This is just to test XAMPP.” message. If you do, go ahead and delete the
hello.txt file. Remember to use http://localhost:8000/ instead of
http://localhost/ when you’re developing your site.